Thursday, August 17, 2017

TGIFF - Strong

Welcome to TGIFF @ A Quarter Inch from the Edge! If you're new to the blog, I hope you'll take a few minutes to tour around and leave a comment or two. I read every one! If you're not so new to the blog, you might have noticed a wee blip last week where I was hosting TGIFF. Nope. I'll chalk it up to computer error! I just wanted to reassure you that you're not reading double!

Shockingly, I pulled off another finish for this week.... and not just a pile of pincushions. Something a little larger this go round!
Regular readers will know how strongly I feel about extra love being sewn in to handmade items. It's why, when the shit hits the fan, I tend to get sewing. I can't change the situation, but I can give someone a warm, soft place to curl up under or lay their head on. This week's finish? Well, it's to remind a friend of their strength. Pure, unadulterated strength. Strength that has gotten them through 100% of their crappiest days to date.

I had so little in the way of a plan for this pillow. I just started sewing low volume scraplings together. I mean, low volume works in everyone's decor, right? Once the scrap blobs got big enough, I cut them into 5 inch squares and slapped 'em on the design wall.
Once I was happy with the distribution, I sewed them up. The recipient had told me her favourite colour was red, so I did my best to get those wee red polka dot scraps well distributed.
Then on to the quilting. I know, I know. What is that hideous lavender doing there? I use cast off FQs as pillow innards. Don't judge me. And I know I've been FMQ spiraling a lot lately.... like on this pillow. But I like it. So there.
I know what you've been wondering since the beginning of this post. HOW DID SHE DO THOSE LETTERS? Heat and Bond Ultra, of course.
And my new little friend, a Cricut Explore Air 2 (which I purchased a mere two weeks before the hype for the Cricut Maker started. Let's not speak of it.)
I haven't made much so far. I'm sort of overwhelmed by the possibilities. But this seemed like a great place to start. I used the design software to write the work and spent three days choosing the right font. Okay, maybe it wasn't three days. But it was a long time!
 I got a little worried when I saw this... the frayed edge and the cutting blade didn't get along so well.
But my trusty dental pick got that letter off smoothly and I was able to trim and re-cut the small area that had gone cattywampus.
The letters came off the sticky mat with ease. Sometimes the Heat and Bond paper was left behind, but that was no big deal. I was taking it off anyway!
 And presto. Ironed in place.
 Those swirls look fab on that low volume scrappiness... if I do say so myself.
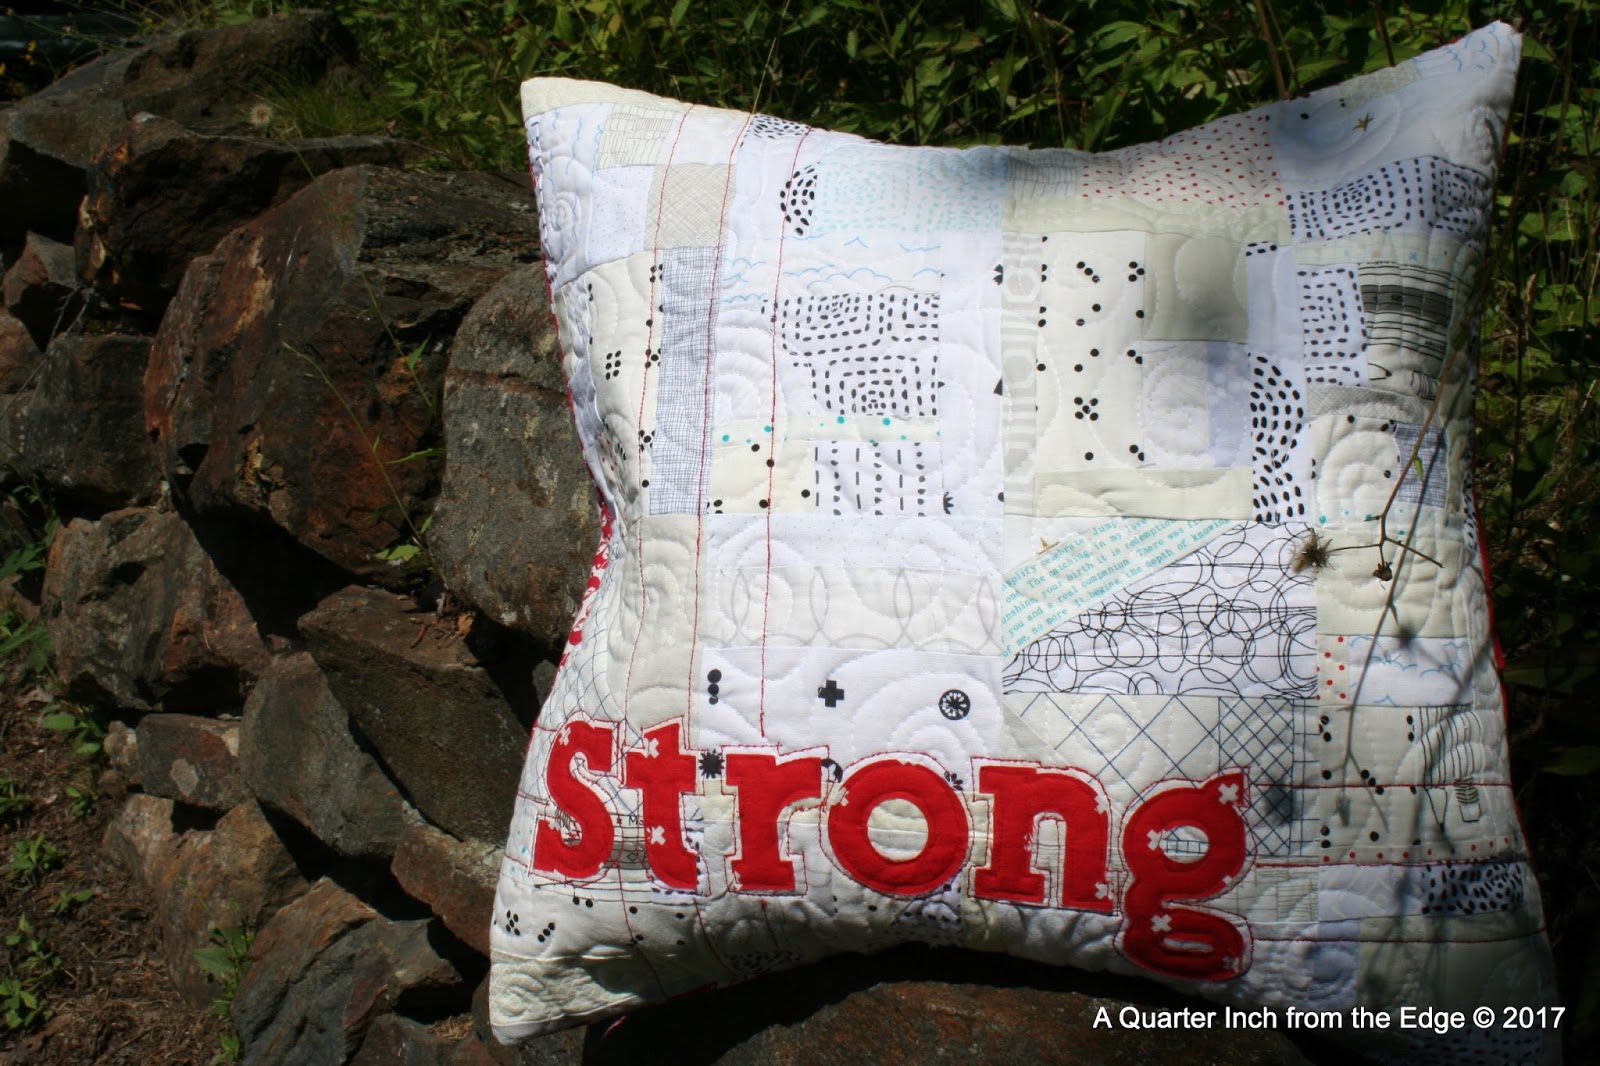
I wanted to get just a little more red into the pillow top, so I outlined the red Cotton+Steel XOXO letters with a heavy red stitch. Given enough time, I think I might have liked to hand stitch around it with perle cotton. Try to contain your shock. I also did three horizontal and three vertical lines of stitching... representing the recipients three kiddos.
Oddly, my stash is short on reds. Dena @ No Frickin Blog yet is horrified. Gasping for air even. But it's true. But red was needed here, so I used a chunk of a cute Lewis & Irene fox print that's been curled up in my stash for some time and a piece of Kona Cardinal for the other side of the envelope closure. With such a scrappy front, two fabrics on the back won't hurt anyone!

  And there it is. Strong. Hopefully it gives a little comfort and strength to it's new owner.
Now it's your turn. Link up those fabulous finishes here and don't forget to tour the other blogs and spread the comment love! Please include a link and/or button for Thank Goodness It's Finished Friday! so your visitors know what this TGIFF thing is all about!


Hope you'll come back soon! I've got more pincushions to show off and some back to school clothes in the works!

J

Friday, August 11, 2017

Friday Finish - Pinnie Parade FOMO!


Today could be Finish up Friday or it could be FOMO Friday! If you're into the Instagram (I'm well and truly hooked), you might have seen the hashtag #pinnieparade and the accompanying pics popping up this month. I know I have. I could resist no longer. Behold the pincushion trio!

A couple weeks ago, I snagged a copy of Amanda Jean Nyberg (of Crazy Mom Quilts fame)'s new book, No Scrap Left Behind. This lady is serious about scraps! And she may or may not have a pincushion addiction. She made one a day in July. You decide. Anyway, she had some patterns for pincushions at the end of the book and I thought they'd be a great way to use some of those wee scraplings that I just can part with!

I meant to pull teal scraps, but the greens were on top. And it just kind of happened! The pincushion is based on Amanda Jean's Bright Birch Trees block that I've always loved. To get started, I pieced together some strings of little green scraps. (Pen for scale!)

 They looked even nicer when pressed and trimmed!
 The setting strips of low volume Blueberry Park started out straight...
 And ended up wonky! Just the way I like 'em.
 Then on to the quilting. I might have gone a little overboard, but it works.
 And here's Green #1 all finished and ready for pins!

You know the best part about pincushion making? The smallest scrap can be used and a moderate sized one is gigantic! Talk about using one's resources. Though if you're looking to clear out your stash, you might need a pincushion a day challenge!

My teal scraps are pretty thin owing to the charity string blocks I've been making for my guild. But there are wee bits!  Perfect for some tiny improv on a skinny pinny.
 I improv pieced some triangles and strips from the pile.
 Again, when it's a small space, you can take the time to go a little nutty with the quilting density!
The only problem with skinny pincushions? They're tricky to turn right side out!
And here's Skinny Pinnie Teal #2

The last of the trio is brought to you by this gem, picked up by Dena @ No Frickin' Blog Yet at our guild yard sale. I know, I know... it's dated. I can't even show you the inside. There's just too much forest green....
But the four inch paper pieced blocks make perfect pincushions. Just goes to show that anything can be made modern!
 My pincushions are stuffed with crushed walnut shells, courtesy of the local pet store. They give the cushions a nice heft (they can double as pattern weights!)
I love this little fussy cut owl. Honestly, fussy cutting and paper piecing are my go to's lately! And here's Orange #3! Now I'm kind of thinking that I'd like a rainbow of pincushions. Hmmm... next week's finish perhaps?
It's nice to think I finished three projects in 24 hours! Yay me!

I'll be linking up with TGIFF @ Quilting is more Fun than Housework (Isn't that the truth!). I'll be hosting next week, so get your finishes photographed! I'm also linking up with Finished or Not Friday @ Busy Hands Quilts. and Can I get A Whoop Whoop? @ Confessions of a Fabric Addict. Pop on over and check out some other finishes!

J

J

Friday, August 04, 2017

Friday Finish - I ♥ boo...

 
Nope... it's not the Hallowe'en quilt that has tempted me over the years. It's more of an all-year-round (and much more practical!) finish.

Double Trouble and I make frequent visits to numerous branches of our local library. We've done puppet shows, sing-alongs, dance parties, youth orchestra performances... you name it! And of course, there are toys we don't have at home and a zillion new books to check out.
And those books needed a more presentable way to travel back and forth! When Jayne @ Twiggy & Opal posted her version of the paper pieced Tall Tales block by Kate Basti on Instagram, an idea was hatched! I started with a few books and the tote grew from there.
It was such fun going through the kid print scrap pack that I snagged at our recent guild yard sale. I can't even choose which book is my favourite (though the Anne of Green Gables one holds a special spot in my heart)!

 
Once I had those wee books sewn up and quilted, I needed a back (or a front... depending on how you look at it!) for the tote. Time for more paper piecing. Honestly. I think this is becoming an addiction.
Thank goodness for Google... it led me to this sweet little heart pattern. It's a free pattern from Piece by Number.
And for the letters, I decided this tote was the perfect excuse to buy a pattern I'd been coveting for a while - My First Alphabet by From Blank Pages. The letters are perfect. Crisp and distinct, without being clunky. And because they're sold as a digital pattern in PDF form, they can be printed at any size. I went for a 4½ inch high letter. And I dove into my low volume scrap bag to make them.
Necessity was the mother of invention for the Windham Literary Library Cards on the Loan on the top and bottom. I only had three FQs of Kona Charcoal and I was determined not to buy anything to make this tote! I was going to leave it alone, but quilting the edges of the cards makes them pop beautifully.
The lining got a little challenging. I don't like to wash quilted bags too often, so it needed to dark(ish), but not too dark owing to the Kona Charcoal on the outside. I managed to find a large cut of this print (London Fog) that I used for my Mom's yoga tote.
Typically, I underquilt things. I want them finished more than I want them fancy. But not this one... I went for it!
Instead of fighting with fabric for the straps, I dug around in my notions bin and found the same seatbelt webbing that I used for my Dad's yoga bag. This time, I didn't hide it under fabric! I need to re-stock!
Phew! That's a lot of yammering on for one little library tote. I loved the creative process of this one. Each stage just flowed into the next and I was able to find just the patterns I needed with a quick web search. It took me less than a week start to finish and that's saying something in this house.

I'm linking up today with one of my favs - TGIFF @ Kathy's Kwilts and More. Pop on over for some inspiration! Alas, Finish Up Friday @ Crazy Mom Quilts is on a month long blog-break, so I'm trying out Sew Can She's Show Off Saturday and Scrap Happy Saturday @ So Scrappy as well. I hope I'll see you back in two weeks' time when I host TGIFF!

J

Friday, July 28, 2017

Friday Finish - Not a Nautical Disaster

There seems to be a nautical theme around these parts lately!
I know, I know! No posts for months and then multiple in a week?! The reality is that there's been sewing and quilting, just not blogging, so there's a backlog of quilty goodness lurking in my hard drive. This finish was from way back in April at our Maritime Modern Quilt Guild Retreat at White Point Beach Resort.  I'm calling this one Not a Nautical Disaster (a little nod to a Canadian treasure... the Tragically Hip). A proud grandmother told me that a special new grandson would have a nautical themed nursery and, if big sis has a quilt, little bro needs one too!)
After making DT's Polaroid quilt, I've had them on the brain. But they're a tonne of work. And lots of trimming. Instead, I went for fussy cut sea creatures with a narrow border of Kona Silver or Kona Nautical and a second larger border of a variety of prints. I bought some fun prints at Patch Halifax (gotta love those octopi!) and hit the stash for some of my favs. These blocks of my own invention finish at 8 inches square. 
Wasn't it nice of this surfer to leave his board as a prop for me?
There's just something about a cobble beach that I love, love, love. I feel the same way about a pieced back. If you've not made one, go for it. I find it really freeing. I don't end up hoarding scrap bundles from projects I really like. I use as much of the fabric as I possibly can (and avoid buying backing!)
If there's a dory around, a quilt has to end up on it. Fitting given the fabric! It also gives you a glimpse of  Dear Stella Into the Reef Painted Anchors binding with a corner of Kona Nautical.
Wavy organic (the official quilting style of MMQG ☺) seemed fitting for this ocean themed quilt. I used a light grey... you know I'm not brave enough for high contrast quilting!
The Deets  
Title: Not a Nautical Disaster
Size:40 by 48 inches
Fabric Used: Fussy cut nautical prints (lots from Rae Ritchie's Into the Reef) and blenders in teal, blue, navy, and grey
Konas Used: Nautical, Silver
Quilting: Wavy organic in light grey
Binding: Dear Stella Into the Reef Painted Anchor, Kona Nautical 
Backing: Pieced with prints from the quilt top
Favourite Part(s): fussy cutting all those sea creatures and hitting my stash for coordinating blenders
I blogged about the early stages of this quilt here.
Writing this post has inspired me. Time to get to the post office and send this to its recipient before he's too big to sleep under it! I'm also linking up with some of my Friday favs - TGIFF @ Celtic Stitches and Finish up Friday @ Crazy Mom Quilts. Head on over and check out some lovely finishes!

J