Showing posts with label Double Trouble. Show all posts

Friday, August 04, 2017

Friday Finish - I ♥ boo...

 
Nope... it's not the Hallowe'en quilt that has tempted me over the years. It's more of an all-year-round (and much more practical!) finish.

Double Trouble and I make frequent visits to numerous branches of our local library. We've done puppet shows, sing-alongs, dance parties, youth orchestra performances... you name it! And of course, there are toys we don't have at home and a zillion new books to check out.
And those books needed a more presentable way to travel back and forth! When Jayne @ Twiggy & Opal posted her version of the paper pieced Tall Tales block by Kate Basti on Instagram, an idea was hatched! I started with a few books and the tote grew from there.
It was such fun going through the kid print scrap pack that I snagged at our recent guild yard sale. I can't even choose which book is my favourite (though the Anne of Green Gables one holds a special spot in my heart)!

 
Once I had those wee books sewn up and quilted, I needed a back (or a front... depending on how you look at it!) for the tote. Time for more paper piecing. Honestly. I think this is becoming an addiction.
Thank goodness for Google... it led me to this sweet little heart pattern. It's a free pattern from Piece by Number.
And for the letters, I decided this tote was the perfect excuse to buy a pattern I'd been coveting for a while - My First Alphabet by From Blank Pages. The letters are perfect. Crisp and distinct, without being clunky. And because they're sold as a digital pattern in PDF form, they can be printed at any size. I went for a 4½ inch high letter. And I dove into my low volume scrap bag to make them.
Necessity was the mother of invention for the Windham Literary Library Cards on the Loan on the top and bottom. I only had three FQs of Kona Charcoal and I was determined not to buy anything to make this tote! I was going to leave it alone, but quilting the edges of the cards makes them pop beautifully.
The lining got a little challenging. I don't like to wash quilted bags too often, so it needed to dark(ish), but not too dark owing to the Kona Charcoal on the outside. I managed to find a large cut of this print (London Fog) that I used for my Mom's yoga tote.
Typically, I underquilt things. I want them finished more than I want them fancy. But not this one... I went for it!
Instead of fighting with fabric for the straps, I dug around in my notions bin and found the same seatbelt webbing that I used for my Dad's yoga bag. This time, I didn't hide it under fabric! I need to re-stock!
Phew! That's a lot of yammering on for one little library tote. I loved the creative process of this one. Each stage just flowed into the next and I was able to find just the patterns I needed with a quick web search. It took me less than a week start to finish and that's saying something in this house.

I'm linking up today with one of my favs - TGIFF @ Kathy's Kwilts and More. Pop on over for some inspiration! Alas, Finish Up Friday @ Crazy Mom Quilts is on a month long blog-break, so I'm trying out Sew Can She's Show Off Saturday and Scrap Happy Saturday @ So Scrappy as well. I hope I'll see you back in two weeks' time when I host TGIFF!

J

Friday, March 24, 2017

Friday Finish - Rainbow Scrappy Happiness

Another wee Friday Finish! I've been working away at filling this basket with my own little rainbow!

DT are growing like weeds and one of their favourite things is to eat at the big table. And they love to mess with Mommy and Daddy's placemats. Time for their own!

Into the scrap bin I went. Sometimes I wonder why I bother buying more fabric. It seems like all I ever manage to use are scraps! 2½ inch squares are my go-to. For a simple bit of patchwork, a 25 patch seemed  right. I even worked in some fussy cuts... I think I might be addicted to fussy cutting. And there's no 12 step plan for that.
I added a 3 inch strip down the side to bring the placemats up to the size I wanted. 9½ by 12 inches is just right for little plates and little hands!

The quilting isn't fancy - diagonal straight lines. If I were to do it over again, I might consider spacing the stitching a little further apart. Once washed, things got very crinkly!
 The kiddos first colour requests were green for BT and purple for GT
On the second round, GT asked for pink. BT for blue. So much for raising them with attention to gender stereotyping!

Round 3 features an orange placemat that Anja @ Anja Quilts thinks is for her to use when she visits. I don't think GT will give it up that easily! I still owe BT a red mat. I've had to mooch some squares to make it happen. So little red in my stash. Dena @ No Frickin' Blog Yet would be horrified.

  BT's not exactly a wee lad. Here's hoping he doesn't outgrow these mats too soon!
I love having little things that I have sewn as part of our lives. I just don't get it when people say that handmade items are too good to use. If they're not used, all that extra love that's sewn in just languishes on a shelf.  Use it, wear it out. We'll make more!
This sunshine-y basket makes me want to make one in every possible colour! Or maybe I'll use my time a little more wisely and get to sewing those Easter projects I have in mind!
I'm linking up today with Finished or Not Friday @ Busy Hands Quilts, as well as TGIFF @ The Carpenter's Daughter Who Quilts. Pop on over and check out some inspirational finishes!

J

Monday, March 20, 2017

Scr-alphabet!

Oh... Pinterest. So damned many ideas. So very little time! This edition of nap time sewing features another Pinterest find - scrappy fabric letters!
Nope. That's not meant to spell anything. Most of the time DT aren't too accurate in their spelling either. At least not yet!

This project is a great way to use up scraps of fabric and batting. A 5 inch square will pretty much work for the top and backing. I figured I didn't need to re-invent the wheel, so I used letter templates from Sugar Bee Crafts. One less thing to take up valuable sewing time!


And when the batting scraps got too small, I made some Franken-batting! Gotta love that zigzag stitch and using up nearly unusable bits!

I decided to stick to prints that were predominately one colour. It would be cool to use a charm pack or a treasured stash collection to make a custom (and coordinated) alphabet.

All stacked up and ready to sew. One wee caveat if you decide to copy my method. Take care to only pull one letter stack (paper, print, batting, backing) off the pile at a time!
Instead of all that pesky cutting out of templates and tracing described in the tutorial, I decided to sew right through the paper. One dull needle is worth that saved time!


It took a little digging to unearth these beauties... my Mom's pinking shears. I can almost hear her scolding me for cutting paper with them. All those fancy scrapbooking scissors weren't around when I was a kiddo!

I can hardly wait to whip up another batch! You can't spell much with just one set of letters! BT and GT can't even spell their names at the same time!
I'm linking up with Monday Making @ Love Laugh Quilt and  Main Crush Monday @ Cooking Up Quilts. Pop on over and see what others have been cooking up!

J

Thursday, February 16, 2017

TGIFF and Friday Finish - Cookin' up some fun!

Welcome to TGIFF at A Quarter Inch from the Edge! If you're new to my blog, I hope you'll cruise around and check out some of my past projects. Perhaps you're a Kona lover like me and want to take on the Kona Love challenge? 

In the non-bloggy world, I'm a Middle School French teacher, as well as a wife and mamma to growing boy-girl twins...currently in the terrible two toddler stage! They're known here as Double Trouble and today I'm sharing some projects I sewed for them for Christmas. Thank goodness Santa has a sewing elf in his workshop so he can bring presents to encourage pretend play and their burgeoning foodie-ness.
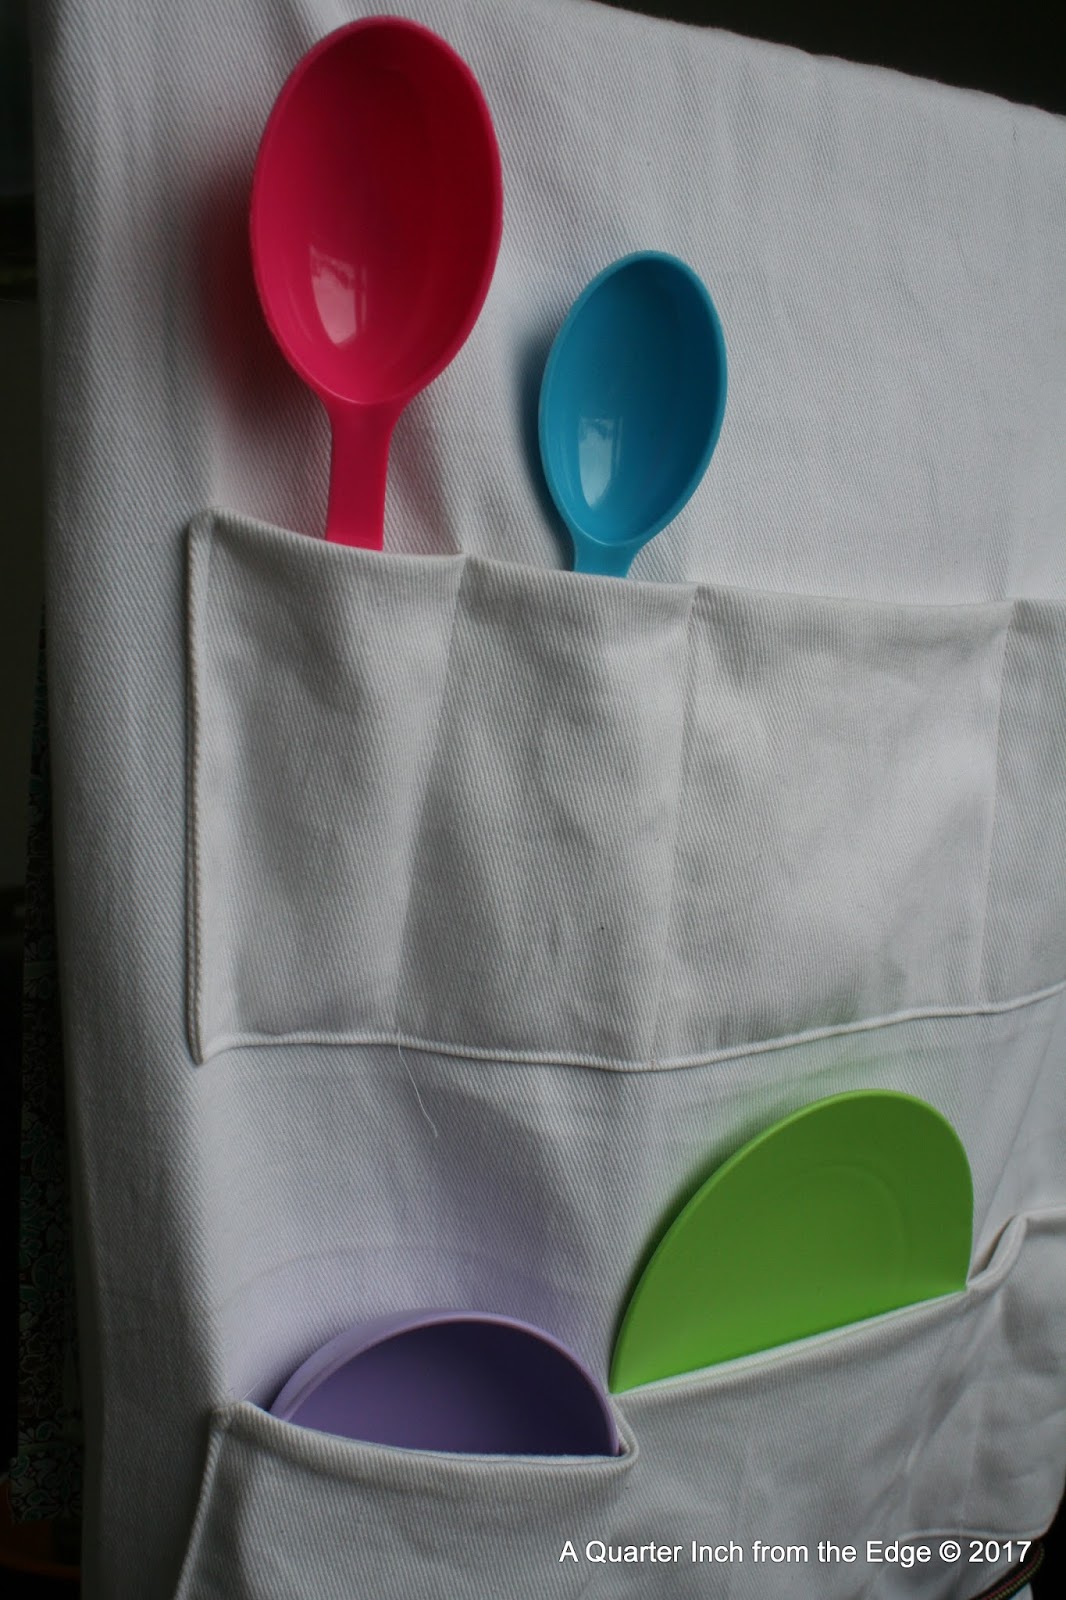
As much as I love a play kitchen, I didn't want a hunk of plastic taking up residence in my living room. After saving a pile of versions of slipcover kitchens on Pinterest, I winged it with my own dining room! chair. The "oven" door even opens! 
The back of the slipcover stove has pockets for storing kitchen gadgetry... or produce. I'm pretty sure there's a Melissa & Doug wooden lemon stuffed in there somewhere!
DT have played with it each and every day since Christmas! And when we need another dining room chair, the kitchen just slides off and folds up. GT loves frying up hotdogs or eggs for her guests!

Just when you thought BT couldn't get any cuter, he's sporting a sushi print apron and oven mitt. I used Peekaboo Pages' Toddler Apron and Toy Oven Mitt tutorial. Now I'm thinking they might need chef's hats!
I love that GT's apron and oven mitt are made from fabric I purchased in Montréal when I was pregnant, and also used for a number of wee bibs before they were born. And I've still got some!


Now it's your turn! Link up your finish from this week and click your way over to some of the other linked blogs. I can't wait to see your finishes!


Thanks for stopping by! Hope to see you again soon!

J

Saturday, January 07, 2017

Long time, no see...

It's 2017. How the heck did that happen? I can't believe that it's been a solid two months and change since I last posted. I shan't go into all the gory details (yawn....so boring). Suffice it to say that a return to full-time teaching in addition to a fair amount of solo parenting doesn't leave much time or energy for sewing or blogging about it.

Here and there, I've managed some sewing and quilting. Much of it Christmas related and/or for Double Trouble. BT needed a little something to perk up his white oxford and jeans for the Christmas season and I managed to convince Himself that ties are super cute. A bow-tie would have been pushing it too far!
I used this quick little tutorial from Sharing the Wealth and added length as recommended by Kelsey @ Vanilla Joy. I see more ties in BT's future!

BT also needed some new Christmas comfy pants. No, GT isn't being left out. She's rockin' BT's ones from last year. I can't let that C+S Washi flannel go to waste. They're way cuter in person. Here's hoping we manage a family pic one of these days!
These pants mimic the ones I made for Himself last year (he said not to waste expensive flannel on him!) and used this tutorial from Sew Jereli. Now that BT has grown out of the biggest size of Big Butt Baby Pants ☹, I had to find a new go-to pattern. I'm pretty sure this is it!

For more than a decade, I've stored my classroom participation tokens in a Ziploc bag. Seriously. It's a case of the cobbler's children going barefoot! When I headed back to the classroom this year, I decided I needed something a little fancier. The In Color Order Drawstring Bag did the trick. I do so love this pattern and that print is just right for my classroom!
Miss K is practically an adult now, but I know she likes to colour occasionally. So I made her a little coloured pencil roll for Christmas. I also made a few to donate to the Halifax Shoebox Project. I wish I'd taken a pic or two first!
How right is that Cotton+Steel pencil print? I've got to make something for myself out of that one of these days! And a little Netorious and Kona Emerald rounded out the interior.

So there we are, dear readers. Proof that I've not dropped off the planet or given up sewing. I make no promises, but I'm hoping to be here more regularly in the coming months! Hope you'll be along for the ride!

J

Friday, July 29, 2016

Friday Finish - For the little fishies

More and more often, quilting is getting eclipsed by, you guessed it, kid sewing. It might not be as creatively satisfying, but I do love seeing DT running around playing with or wearing something I've made for them. This time, it's hooded beach ponchos.

Most of the tutorials I found required a bath towel and a hand towel, but I wanted to use these two beach towels from the collection. (The light is very wonky here... yikes!)
But I did find this tutorial from Fireflies and Jellybeans that didn't require anything extra, so off I went. I adapted it for the size of the towels I had and opted keep the body of the towel (and poncho) as one piece and cut a slit instead of making a shoulder seam. It seemed like a tidier look to me. Instead of pinning the hood to the towel, I used my trusty Wonderclips. Honestly, what did I do before these?
I went back and zigzagged any raw edges since toweling frays like mad. I tried to use the existing finished edges of the towel wherever possible. It not only made the project come together more quickly, but gave the ponchos some fun details.
 I'm particularly pleased with the hood on BT's poncho!
After a week-end of use at the cottage, I'd say I'll be making more of these once DT grow out of them. It's tricky to keep a towel on a perpetual motion machine! GT's poncho is a smidge too long, so I'll be making some modifications before our next swimming adventure! 

I'm linking up with TGIFF @ What A Hoot Quilts as well as Finish Up Friday @ Crazy Mom Quilts. It's a small finish and it's #notaquilt, but sometimes you just gotta do what you gotta do!

Friday, July 15, 2016

Friday Finish - Damask. Yup. Damask.

Last week, DT had a big role in a family wedding. BT didn't need much to liven up his outfit, but the bride is a big fan of damask. So I worked up a few accessories for her simple white flower girl dress. It was important to choose a small scale damask print, otherwise it would be unrecognizable. This one, ordered on-line from Flare Fabrics, turned out to be perfect!


First up, a little belt. To make it look a little more finished, I angled the ends. Not hard at all, but it adds a little something!
It's always at about this point that I wish there was a much easier way to turn a VERY long tube inside out!
 Et voilĂ ! A simple little belt!
 The tie was longer once GT had it on... it cinched the dress in a little bit!
I was a little worried that GT might think it was fun to flip her dress up and wanted a contingency plan. Enter The Perfect Diaper and Nappy Cover from Made Everyday. It's a multi-sized free pattern and tutorial that I can definitely see making again!
Have I mentioned how much I love tutorials and digital downloads? No paper to keep track of. Just set my laptop up on the desk and away I go!
These sew up so quickly and add a little more class to a formal outfit. I surprised the bride with these and she thought they were perfection! Dena @ No Frickin' Blog Yet was really hoping for ruffles, but I was on a tight timeline.
I'm linking up with Finish Up Friday @ Crazy Mom Quilts, as well as TGIFF @ Celtic Thistle Stitches as well as Next week, I hope you'll come on back and link up a finish. I'm hosting TGIFF!