Showing posts with label tree skirt. Show all posts

Tuesday, December 24, 2013

Merry Quilt-y Christmas!

Well, the tree is decorated, Miss K and Mr J's gingerbread houses are covered in icing and candy (as were they), the presents are wrapped, the groceries are purchased... must be time for... the Christmas collapse. I'm confined to the couch with a Christmas cold/flu. Oh well, at least I can blog and watch The Grinch!

My love of decorating for Christmas is forever at odds with the number of Rubbermaid totes I have to pack under the stairs each year! I love tree ornaments and have so much trouble resisting the urge to buy more. On the quilting front, I didn't really think that I had a lot of quilted Christmas items... until I started writing this post! ☺

Christmas decor is so special to me that I never just want to make any old thing for Christmas. I want it to be just right... since it will likely be a part of our traditions for years! The perfect example is this year's addition - the asterisk tree skirt.
It took me years to find just the right tree skirt! I made two prototype skirts last Christmas in an attempt to find just the right one! I blogged about the making of this one here. If you're looking for a tutorial on how to make the blocks, look no further!  I'm more than a little obsessed with this Valori Wells print from the Wrenly Christmas line. I almost hated to use it as backing... then again, there's still some on the bolt at my LQS. Can you say Boxing Day sale?
The same print makes an appearance in my new pillow covers. I started the hexie pillow last week-end with thoughts that I might finish it for next year. But those hexies are just so addictive. And I couldn't have just one pillow on the couch, right? I'm already plotting more for next year - maybe even as gifts!

A couple years ago, Q-D showed up at a Quilt Therapy session with these little paper pieced darlings. I couldn't resist (neither could Q-B!) and ended up making two.
I love hanging it up at the beginning of December. I've had requests to make this one as a gift, but I just can't face those borders again!

Another paper pieced project - the infamous stockings. Our family likes a big stocking... it's not greed, it's tradition! Himself didn't have a stocking with his name on it... yet another family tradition... so I made him one. But didn't manage my own until at least a year later!
One of these years, I might break down and made a Christmas couch quilt. I really want one, but it always seems like so much work for such a short time. And where to store it the other eleven months of the year?

As we're all hustling about putting the finishing touches on what we hope will be a perfect holiday, I'll leave you with a little insight from our pal, the Grinch.
Merry Christmas, dear reader! Enjoy whatever it brings, even a partially cooked turkey or a collapsible table collapsing during dinner. They can't happen more than once, right?

J

Tuesday, July 09, 2013

Tutorial Tuesday - Asterisk tree skirt block

Hey all!

I'm taking another flying leap into new things this Tuesday! A tutorial! I couldn't find the right tutorial for how to make an asterisk block, other than the video on Craftsy. Not everyone loves a video or wants to sign up for another free web membership, so an idea was born!

*** Disclaimer - This project is not my own design. It is a version of a project from sewknitsew. The blogger gives partial instructions on how to make the project, but not the block itself.***

Here we go!

1) Prepare your wedge template and cut your 12 wedge pieces. sewknitsew explains this nicely. Prepare 2 inch strips from the same fabrics. Mix and match your wedges and strips until you're happy with the pairings.

2) Okay, scary bit here. Make a random slice across your wedge using your ruler and rotary cutter. I liked the look of blocks where I made my initial slice low on the wedge.
3) Sew on your 2 inch strip. Leave some excess on either edge of the wedge for insurance purposes. Press toward the dark fabric (that's just how I roll), but you might prefer pressing outward to reduce bulk on future seams.
4) Line up your sliced off portion of wedge with the newly added 2 inch strip.  You don't need to fuss about it lining up too much because you're going to be trimming the block eventually. Sew on the sliced off bit and press (again!)
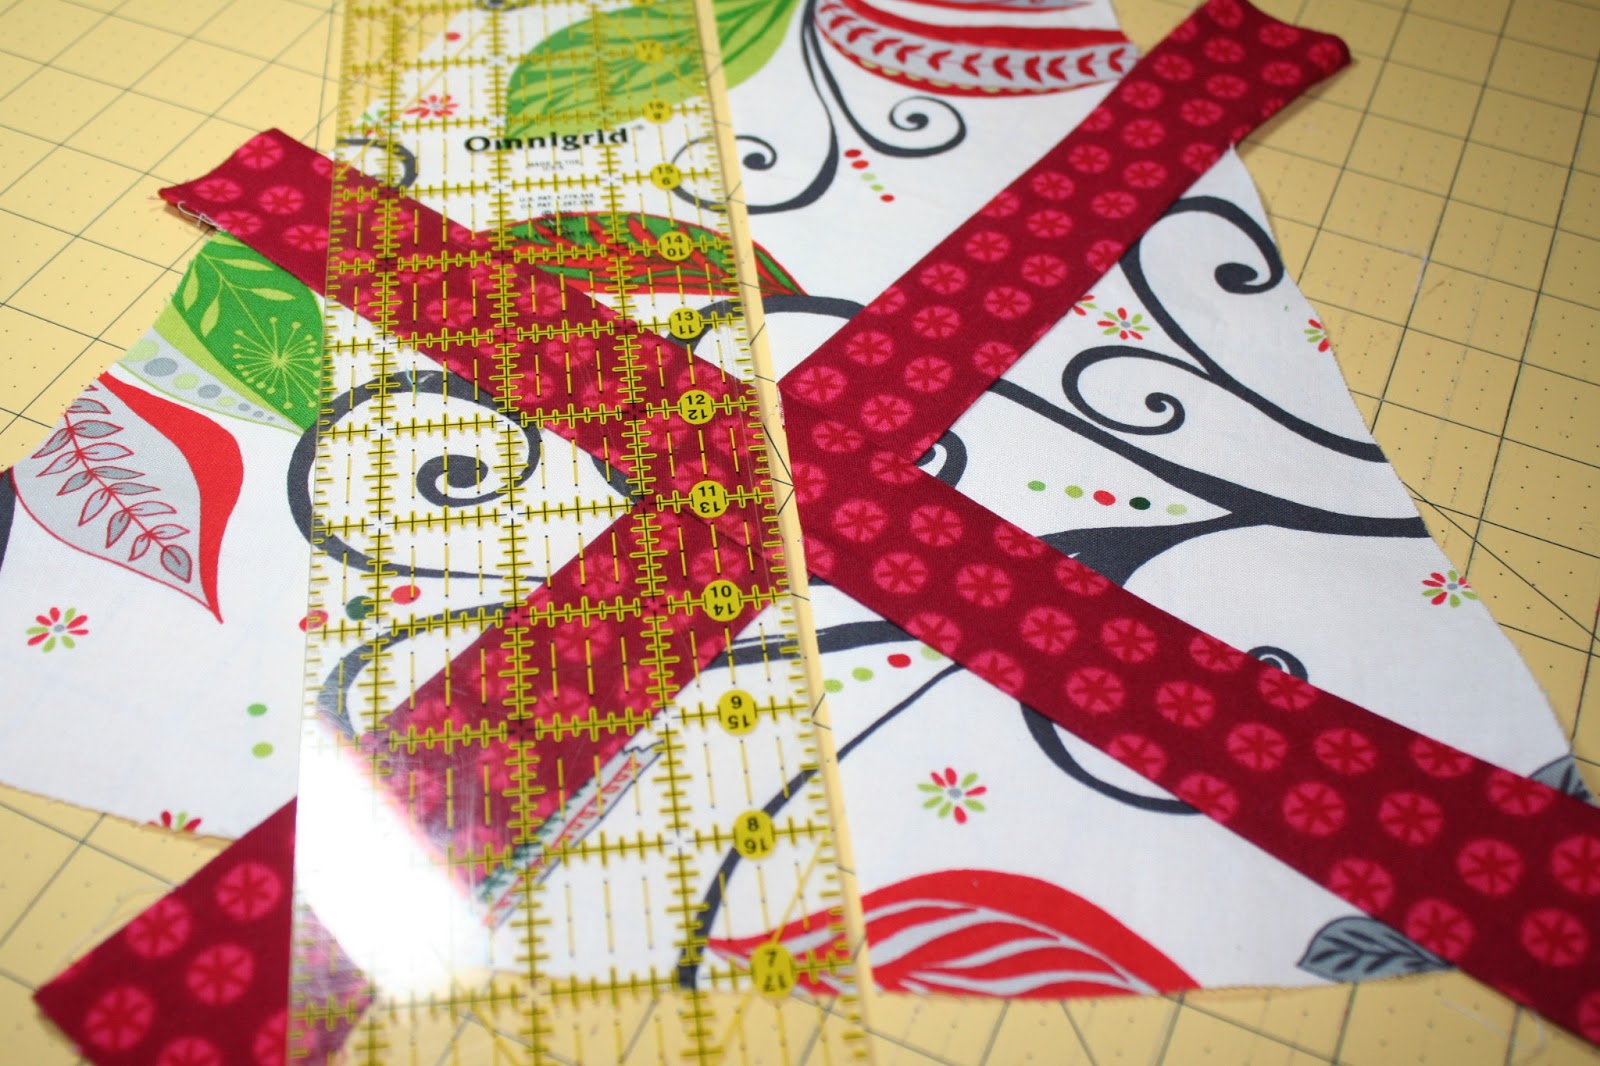
5) Grab that ruler and rotary cutter and make another slice. On some of my blocks, I tried to center the slice on the inserted strip. On others, I didn't. If you want a straight asterisk, take care to make your second cut perpendicular to the inserted strip.
6) Insert your strip just as you did the first time. To line up your sliced off bit this time, lay the piece to be sewn on top of the piece with the strip and then use your ruler to create a ¼ inch seam allowance.
 Flip it up to see if the pieces line up.
Or you can line up the excess/tails with the established seam. Whatever works for you. And if they don't line up perfectly, it's not the end of the world! This block can be as wonky as you like it! I'm not normally one to use pins, but they're useful at this step. As you get more seam allowances at play, your pieces can slip.
7) Make your next slice through the x created by your inserted strips. Insert the third strip.
NB: I had a funny thing happen with a number of my blocks. Depending on which way I made the third slice, I got little triangles. It happened with the block in the tutorial. I think the solution is to make the third cut perpendicular to what is shown in the image above... 
8) Okay, this is the last time you have to slice up your hard work! Make another slice perpendicular to the third strip. Insert your fourth strip.
9) It's all over but the trimmin'!
 10) Play with the position of the template until you a) have fabric under all parts of the template and b) like where the asterisk will be on your block. Pin in place.
Use your ruler to trim the sides...
 ...and scissors to trim the rounded bottom edge.
11) Et voilĂ ! A finished wedge asterisk block!
Now make 11 more and you're well on your way to a tree skirt!

After making these wedge blocks, I've started thinking about the possibilities for square asterisk blocks. So many ideas, so little time!

Happy asterisk-ing!

J


Thursday, July 04, 2013

It's gettin' hot in here...

If I were a still a kid, this would be exactly the sort of day that my Mom would be chasing me outside to play.

So, what to do on a beautiful summer's day?

Get to work on a Christmas tree skirt, of course! Sorry, Mom. With so much of my Gotta Do list finished, it's time for new projects!

I found this cool treeskirt over at Sewknitsew a while back and filed it away for future use. The blog doesn't provide a full tutorial, just a link to her Flickr stream that shows step by step pics, but she gave a few keys hints on how to proceed in her comments.

The trickiest part (and probably the part I'm most proud of) is that there's not template given for the wedge portion of the treeskirt. I had to draft it myself using the explanation given. No problem for Q-D, but a challenge for me! I don't normally use the angle lines on my ruler, but it came in handy today. Thank goodness for chart paper, otherwise I'd have been taping 81/2 by 11 sheets together!

I went on a little post-Christmas shopping spree when everything was 50% off. Turns out, I could have bought way less of each print. But I didn't know that at the time! Here are my selections. Each wedge of the tree skirt will be a different colour. I'm also throwing in some Kona (quelle surprise!) - White, Kiwi, and Cardinal.

They look so happy out on the deck in the sunshine!

Then on to cutting out the wedges... I cut only 11. Turns out I need one more fabric. Maybe a green Kona - Clover, Jungle, Holly? - so hard to decide. I used the scraps left over from the wedge cut to make 2 inch strips for the asterisks.
 
Then I did something crazy - I signed up for Craftsy. I fear the avalanche of new patterns/classes/ideas may crush me. I knew they had an asterisk block in their 2012 Block of the Month series and I couldn't find a satisfying tutorial. Turns out they're dead easy (and a lot like the Shatter Glass block I made for ModQImprov Canada last week.) Who knew?!

Sorry, no process pics this time... I still have lots of blocks to make, so I'll share the complete tutorial later! Here she is... the first of twelve!

I'm pretty pleased with how well I managed to line up the arms of the asterisk. Normally, they'd end up half wonky on me. I'm prepared for that to happen in future blocks!

So, any Christmas in July action happening at your place?

Happy Sewing (and Happy 4th of July to any American readers out there!)

J

P.S. Mom, if it's any consolation, I'm giving serious thought to going to the beach now that this block's done ☺


Wednesday, January 09, 2013

Inaugural WIP Wednesday!


A couple years ago, Q-A made a list. A considerable list. It was of all the unfinished (and some un-started) projects floating around her sewing room. She decided that she wasn't going to start any new projects until she had finished her UFO list. I'm not sure if she's finished off her list yet, but she's stuck with it. She generally only starts new projects that have a purpose (gifts, charity, etc.).

Well, I was inspired, as I often am by my Squares, to make my own UFO list. I keep it taped to the wall behind my sewing machine so that each time I sit down to work, there it is. It's really satisfying to cross things off the list... A type or what?!  I generally update it every January. 

I'm not bound to the list in any way... I can begin new project whenever I like. But it is a good reminder of what's tucked away needing completion. This year's list is soon to be posted!

It has three sections: UFO's, Wanna do's, and Christmas do's. UFO's are UnFinished Objects. Some have been around for quite some time... Child's Play was likely begun sometime in the early 2000's. Maybe this year will be the year it moves off the list! The Jewel Squares may morph into a different project; they began as a full size quilt and could easily become blocks for baby quilts.


I knocked a lot of projects off the list in 2012 - including a this Kaleidescope Bali (a graduation present for honourary Q-Square SuperKate)..


UFO's 
  •  Child’s Play  – needs to be layered & quilted – donate to IWK? Sell?
  •  Jewel Squares (Kaffe Fassett) – finish paper pieced blocks, etc.
  •   Sashiko fish – finish appliquĂ© & sashiko stitching, construct
  •  Qui-vet for spare room – add duvet backing & finish edges
  • C & S’s wedding quilt – MUST start!
  • Mariner’s Lunch Box Challenge – Finish by Spring 2013
  • Madame P’s retirement quilt  - Yet to be started, finish by June 2013
  • Miss K's birthday quilt – Yet to be started, finish by July 2013 
The Wanna do's are just what they sound like. They're projects I've dreamed of making, but just haven't gotten around to. They're based on patterns purchased on vacation, collections of fabrics I bought without a clear purchase, inspirations from books/mags/Pinterest... you name it. As of this week, a lot of Wanna do's moved to the UFO list for 2013!  
Wanna do's
  •  Canadian Guiding quilt (as second camp blanket)
  •  Small seasonal quilts for the classroom (Back to school, spring, summer, New Year's, Chinese New Year)
  • Guide Law quilt
  • Project using Kona solids
For reasons of national (okay, not quite national) security, the Christmas do's don't appear here. I can tell you, without endangering anyone, that after making two tree skirts in 2012, I am finally planning to make a tree skirt for our home. I've even decided upon the design AND have half the fabrics purchased. Thank you, Atlantic Fabrics, for your 50% off Christmas sale!

Here's the photo set on Flickr It's not exactly a tutorial, but I think I can make it work. 

Hope you'll come back on the second Wednesday of next month to see how the UFO's have progressed!

J

Thursday, December 27, 2012

Holiday Fun!

It seems like it's been forever since I spent much time in the studio. I swear, there's likely a layer of dust on my machine!

Most years I crank out a number of quilt-y Christmas presents and this year is no exception. Though I only managed two projects, they were sizable!

Both sets of parents got new tree skirts! For the Z's, I used the block tutorial over at House of A la Mode as suggested by Stitched in Color. The fabrics are a wide selection of reds, greens, and golds. You'd think it would have made a dent in the Christmas stash, but there's still way too much in that pile!


It's already headed home to Cape Breton and found it's place under the tree!


For the T''s, I needed a replacement for the horrendous dusty rose and ivory poinsettia creation that's been under the tree for some time. I take full responsibility for it's creation, but it had to go! Before you ask, I will NOT be posting a pic of that treasure!
Their tree features a lot of gold and red, so this seemed a good colour combo. And a reason to use more Holiday Flourish by Robert Kaufman. Q-D and I are particularly big fans of this fabric line. It'll be all I can do not to add more to the stash in the Boxing Day sale temptation!

Once again, I didn't manage to make one for our household. I'm calling these my prototypes... maybe next year! It took me forever to find the right stocking pattern for Mr. Z and I!
And with most of the holiday madness over, there may actually be time for some quilting/sewing before heading back to work!

Merry Christmas all!

J